Address:
Shenzhen Bao'an District Xinqiao Subdistrict Huangpu Community Huangpu East Ring Road No. 504 Shenzhen Yuan Industrial City Building C
Work Hours:
Monday to Friday: 9AM - 21PM
Weekend: 9AM - 21PM

Address:
Shenzhen Bao'an District Xinqiao Subdistrict Huangpu Community Huangpu East Ring Road No. 504 Shenzhen Yuan Industrial City Building C
Work Hours:
Monday to Friday: 9AM - 21PM
Weekend: 9AM - 21PM

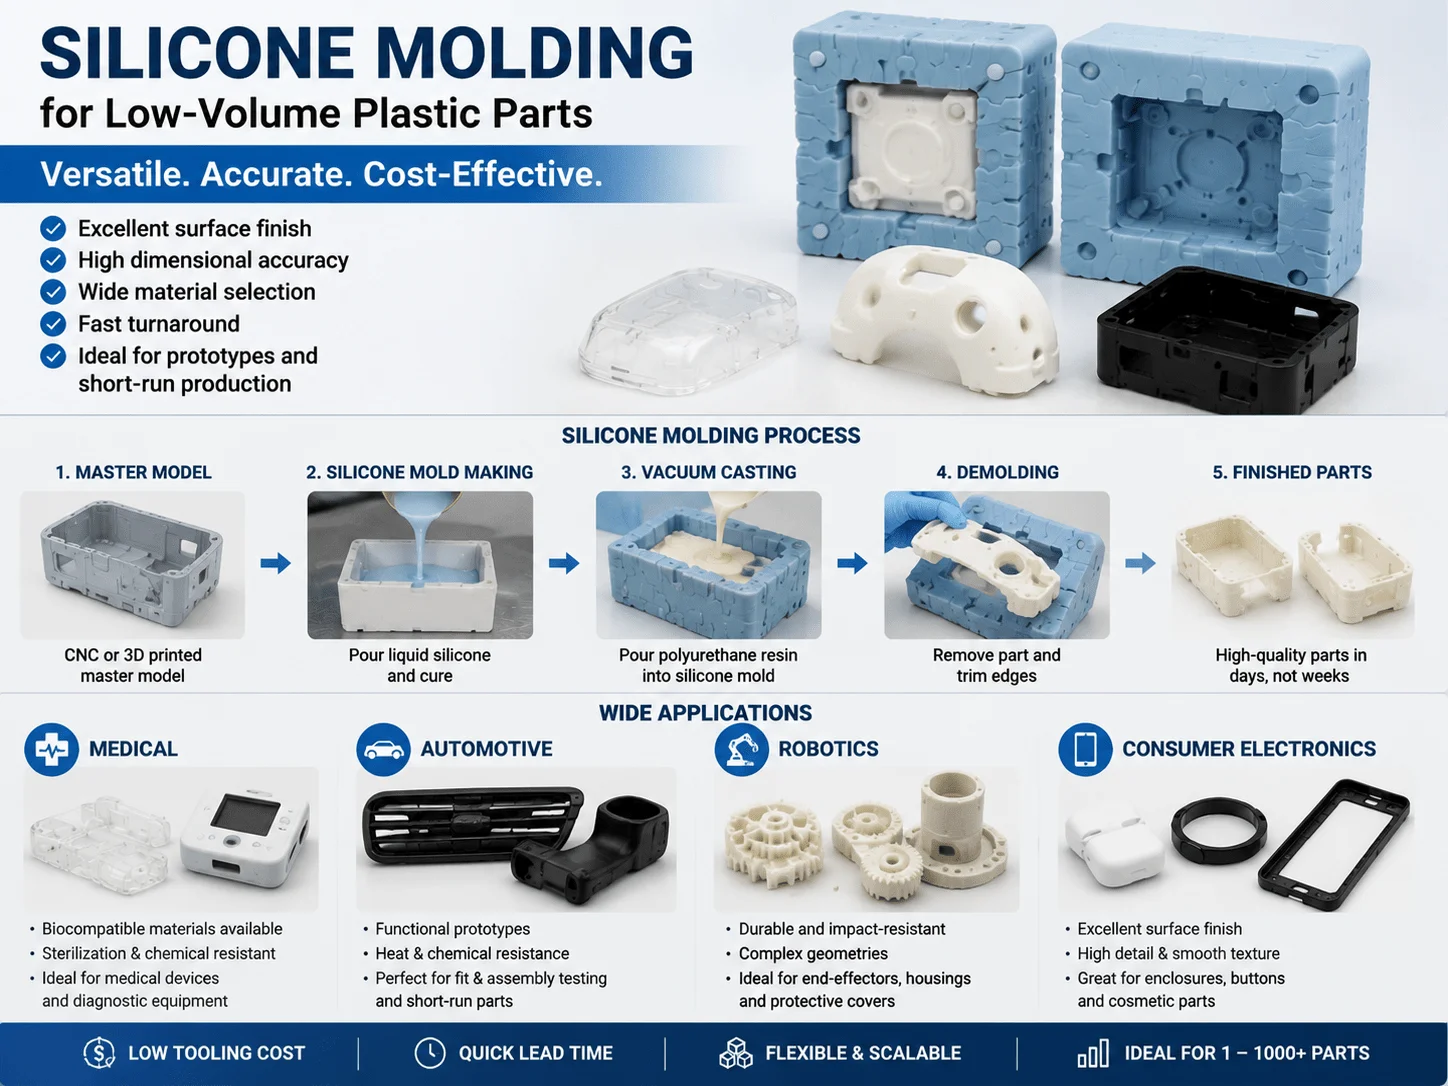
When 3D printing cannot provide the required material behavior and injection molding tooling is too expensive, silicone molding for low volume plastic parts offers a practical bridge between early prototypes and production. Also known as vacuum casting or urethane casting, the process can deliver small batches of plastic-like parts with excellent detail, consistent appearance, and a lower upfront investment than hard tooling.
Silicone molding is especially useful during new product introduction. It allows engineering teams to validate assembly, ergonomics, color, texture, market response, and limited functional performance before committing capital to injection molds. The process is commonly used for medical device housings, handheld electronics, automotive interior components, robotics covers, consumer products, and industrial equipment.
This guide explains silicone molding materials, manufacturing costs, mold shrinkage, surface finishes, prototype overmolding, design-for-manufacturability considerations, and supplier selection for engineers, product developers, and procurement professionals.
How Silicone Molding and Vacuum Casting Work
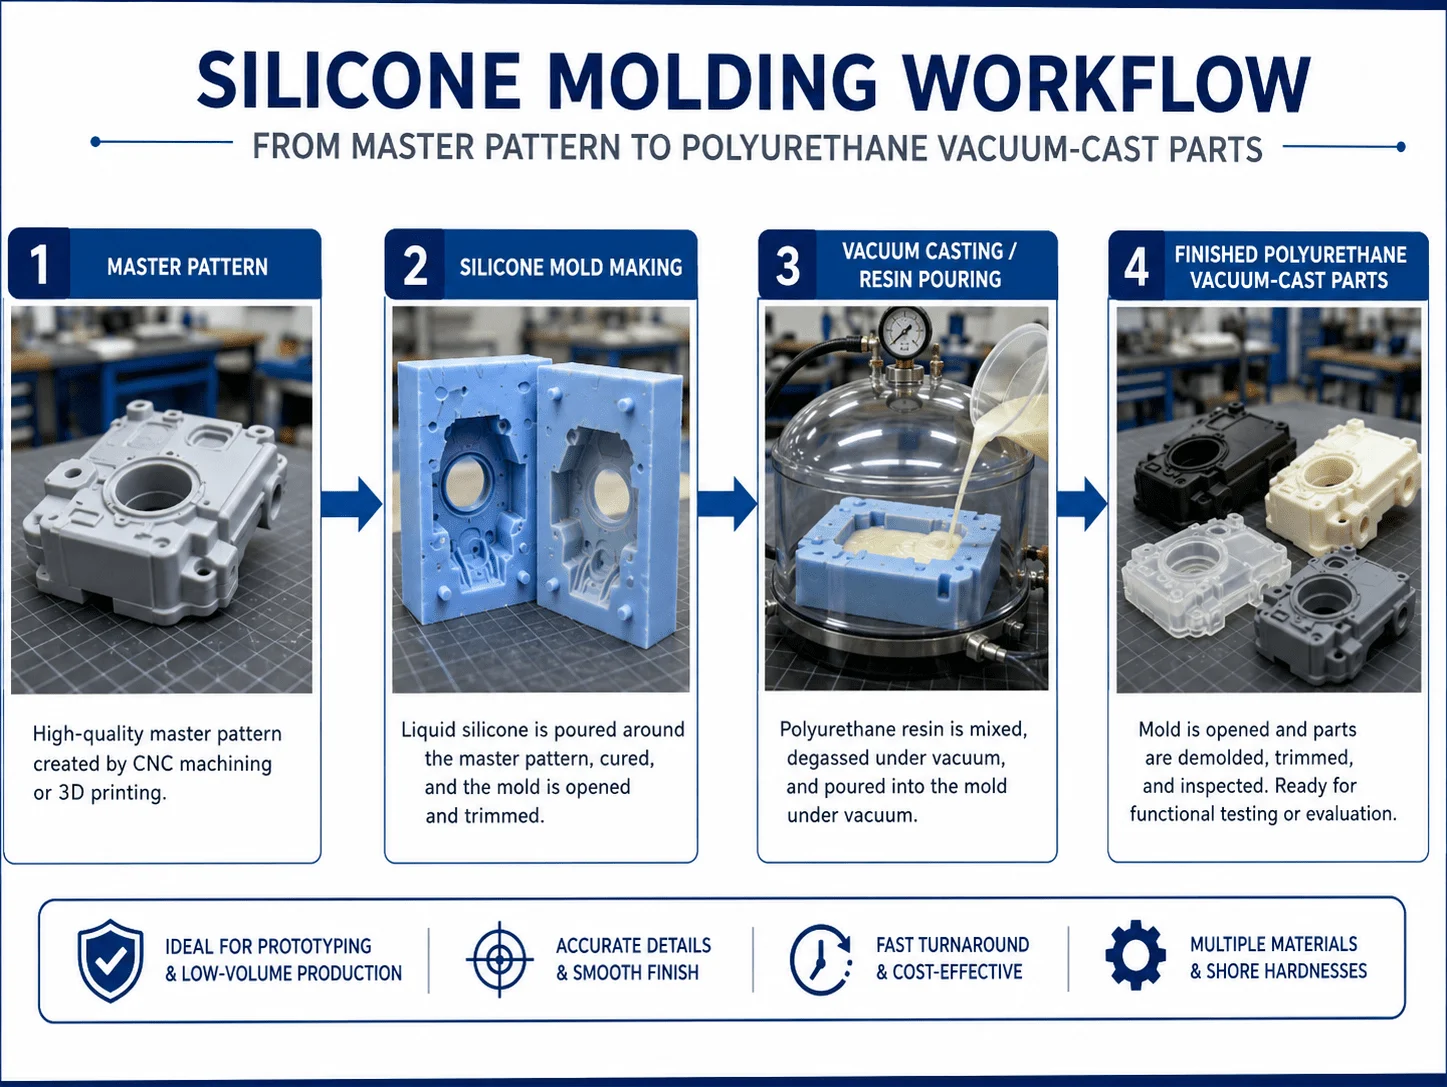
Silicone molding begins with a high-quality master pattern. The master is typically produced by CNC machining or SLA 3D printing, depending on the dimensional, cosmetic, and lead-time requirements.
The master is then sanded, polished, textured, painted, or otherwise finished to represent the intended production surface. Because the silicone mold reproduces fine details, visible scratches, layer lines, tool marks, and polishing defects on the master may also appear on every casting.
A two-part silicone mold is cast around the master. After the silicone cures, the mold is opened, the master is removed, and gates and air vents are prepared. A polyurethane resin is then mixed, degassed, and poured into the mold under vacuum.
The vacuum reduces trapped air and helps the material reach small features and detailed surfaces. After curing, the part is removed, trimmed, inspected, and finished.
Depending on the geometry, resin, mold design, and cosmetic requirements, one silicone mold can normally produce a limited number of parts before wear begins to affect dimensions or surface quality.
The process differs from production injection molding. Vacuum casting uses flexible silicone tools and polyurethane casting materials, while injection molding uses metal tooling and production thermoplastics. Vacuum-cast parts can closely simulate materials such as ABS, PP, PC, or elastomers, but they do not always reproduce the exact long-term properties of those thermoplastics.
| Process stage | Primary purpose | Common quality risk |
| Master pattern production | Establish geometry and finish | Dimensional error or visible print marks |
| Silicone mold creation | Replicate the master | Poor parting line or trapped air |
| Resin selection and mixing | Match functional requirements | Incorrect ratio or viscosity |
| Vacuum casting | Fill detailed mold cavities | Bubbles or incomplete filling |
| Curing and demolding | Stabilize the component | Distortion or premature removal |
| Finishing and inspection | Meet visual and dimensional needs | Color variation or excessive rework |
Industry Applications: High-Performance Prototypes
Medical Innovation: Using biocompatible polyurethane resins for vacuum casting
Using biocompatible polyurethane resins for vacuum casting can help medical R&D teams produce housings, ergonomic models, research components, and limited validation samples without waiting for full production tooling.
The critical requirement is to match the material documentation and intended application to the actual test. A resin described as biocompatible is not automatically suitable for every medical device application.
Engineers should review:
The applicable biocompatibility test standard
Type and duration of contact
Sterilization method
Cleaning process
Post-curing requirements
Chemical exposure
Supplier traceability
Intended test environment
A resin appropriate for an external device enclosure may not be suitable for prolonged patient contact, implantation, fluid pathways, or repeated autoclave cycles.
Vacuum casting is particularly useful for medical development projects requiring:
Diagnostic device housings
Handheld instrument shells
Wearable enclosures
Clinical evaluation models
Ergonomic grip studies
Transparent covers
Assembly validation
Serviceability testing
Small research batches
The process also allows teams to compare several design alternatives without rebuilding expensive tooling. For example, a medical startup can cast three handle geometries using different hardness levels and textures, then conduct usability testing before finalizing the production design.
For regulated projects, traceability matters. Procurement teams should request material data sheets, batch information, post-curing details where relevant, and confirmation of all finishing chemicals used.
Parts intended only for visual review have different documentation requirements from parts used in functional, animal, or clinical testing. The intended use should always be communicated clearly to the prototype manufacturer.
Handheld Devices: low volume overmolding medical prototypes and Grips
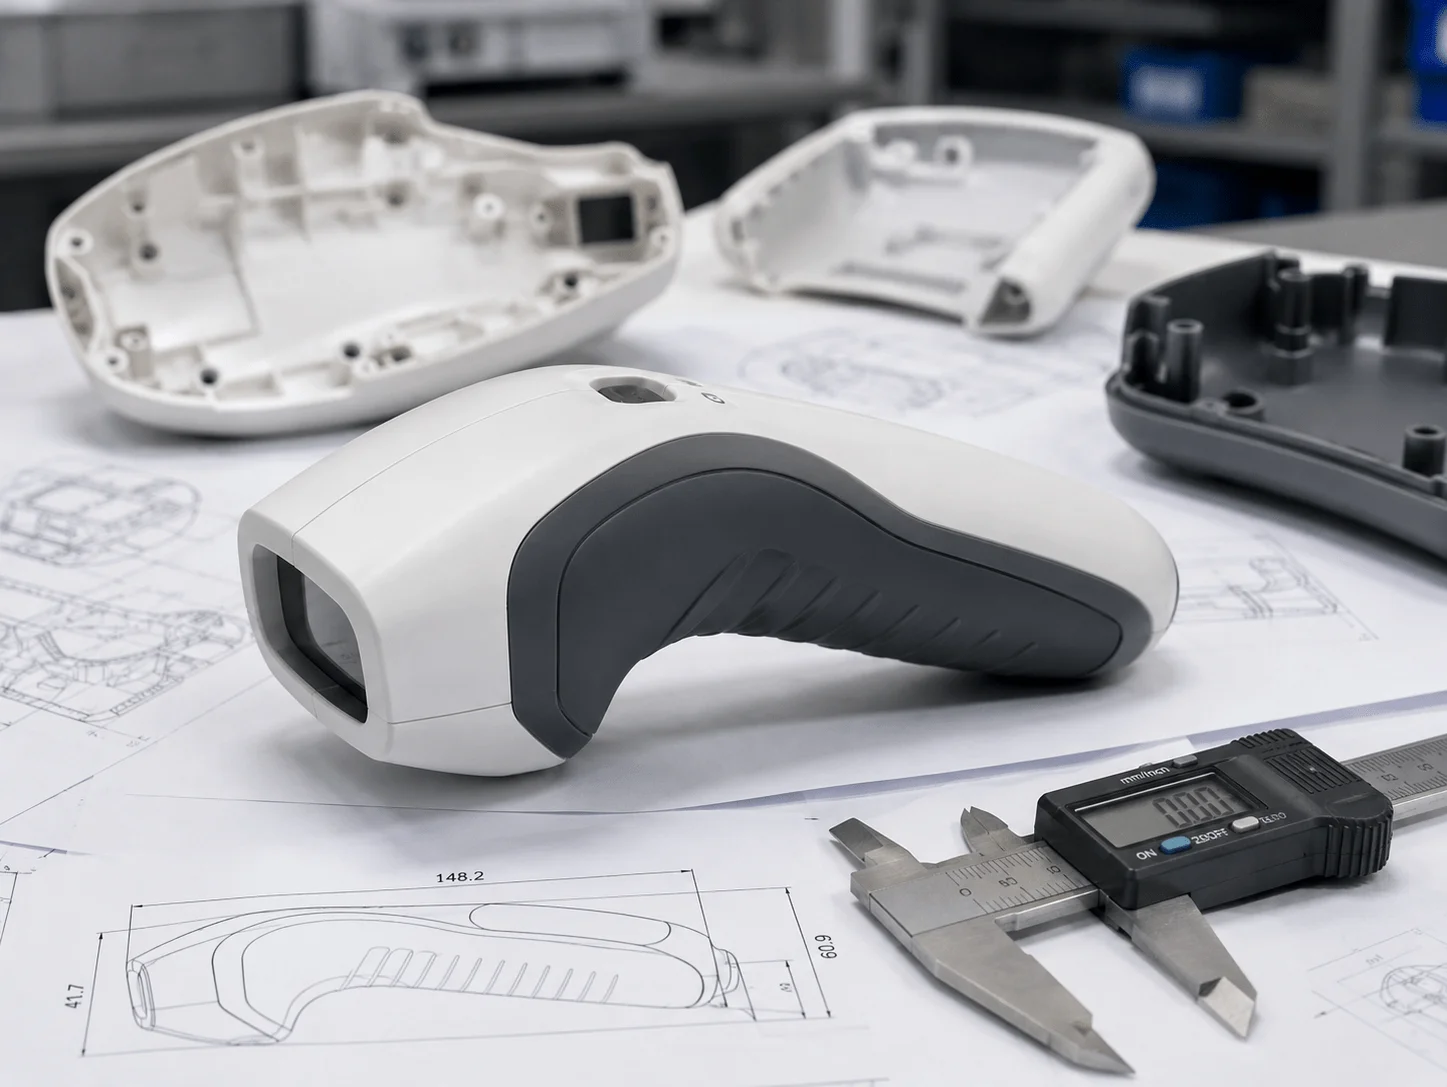
Low volume overmolding medical prototypes allow product teams to simulate a rigid substrate combined with a soft-touch grip, button, sealing feature, or impact-resistant outer layer.
This approach is valuable for:
Handheld diagnostic devices
Surgical tools
Rehabilitation equipment
Laboratory instruments
Portable electronics
Wearable products
Industrial control devices
Production two-shot injection molding or overmolding often requires expensive and complex tools. Silicone-based prototype tooling provides a lower-cost way to evaluate grip comfort, color separation, soft-material thickness, sealing geometry, and user interaction before production tooling is released.
A typical prototype combines a rigid polyurethane material that simulates ABS or PC with a flexible polyurethane or silicone-like layer that represents a TPE or elastomer.
Mechanical locking features are important. Grooves, undercuts, holes, ribs, and textured interfaces help the flexible material remain attached to the rigid substrate.
Engineers should not rely only on chemical adhesion because prototype resins may bond differently from the intended production materials. The prototype should be used to validate ergonomics and geometry rather than to guarantee final overmold adhesion performance.
Common applications include:
Non-slip medical handles
Shock-absorbing instrument covers
Flexible buttons and keypads
Wearable-device contact surfaces
Sealing lips
Protective bumpers
Robotic gripper pads
Consumer electronics grips
Elastomeric Components: liquid silicone rubber prototyping for Seals
Liquid silicone rubber prototyping is valuable when a design requires flexible seals, gaskets, diaphragms, bellows, buttons, compliant joints, or waterproof interfaces.
Production LSR is valued for elasticity, temperature resistance, chemical stability, and repeated compression performance. However, true LSR injection molding normally requires heated tooling and specialized processing equipment.
During prototyping, teams may use cast silicone elastomers or flexible polyurethane materials to evaluate geometry, compression, flexibility, and assembly.
These methods can provide useful engineering feedback, but they may not exactly reproduce production LSR characteristics such as:
Flow behavior
Flash formation
Tear strength
Cure behavior
Chemical resistance
Compression set
Long-term aging
For seal prototypes, critical design factors include Shore hardness, compression percentage, groove geometry, parting-line location, draft, minimum wall thickness, tear-sensitive details, surface texture, and fluid exposure.
A seal that looks correct may still leak if compression is uneven. Testing should therefore include the real mating components, fasteners, pressure conditions, temperature range, and expected movement.
For robotics and automation, flexible prototype parts may also be used to evaluate rebound, joint compliance, cable protection, damping, or gripping performance.
Process Comparison and Engineering Standards
Cost Analysis: silicone molding vs 3d printing cost
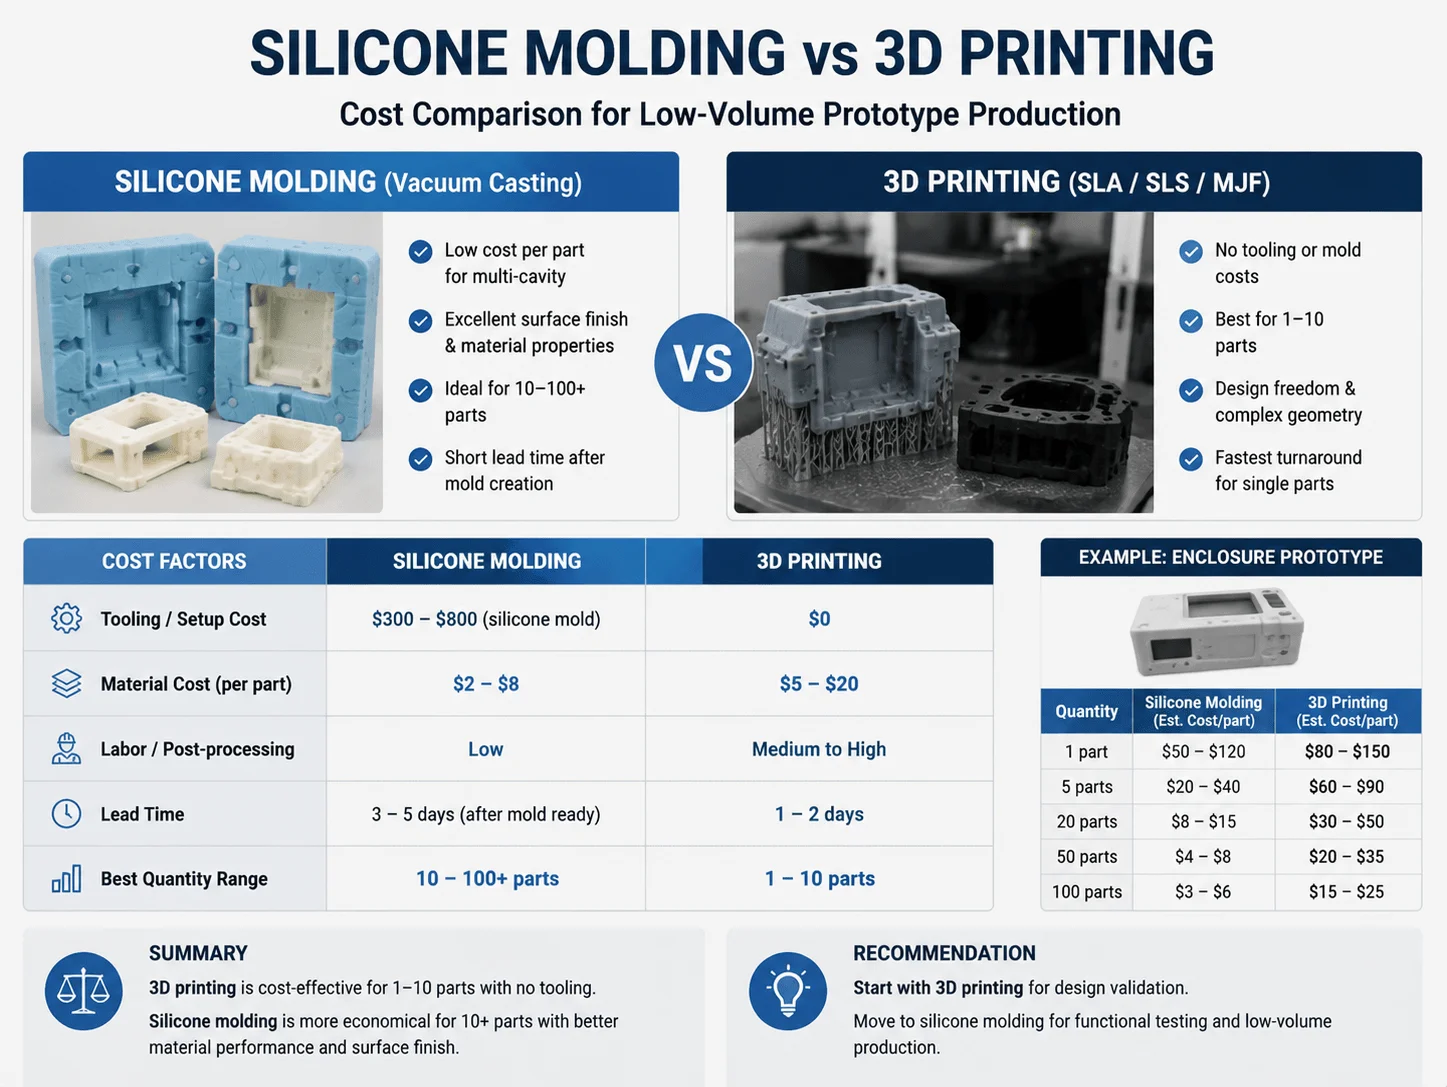
The silicone molding vs 3d printing cost decision depends mainly on production quantity, part size, material, surface quality, dimensional requirements, and post-processing.
For one to five parts, 3D printing is normally more economical because it requires no mold. Once the required quantity increases, silicone molding can reduce the average price per component by spreading the cost of the master pattern and silicone tool across the batch.
| Required quantity | Usually preferred | Cost logic |
| 1–5 parts | 3D printing | No mold cost and immediate production |
| 6–10 parts | Project-dependent | Compare finishing and material requirements |
| 10–30 parts | Silicone molding often becomes attractive | Tooling cost is distributed across the batch |
| 30–100 parts | Silicone molding for many cosmetic components | Lower repeat-part cost and consistent appearance |
| More than 100 parts | Compare multiple molds, rapid tooling, and injection molding | Hard tooling may provide better economics |
3D printing remains advantageous when every component is different, the design changes frequently, or the internal geometry would be difficult to mold.
Silicone molding becomes more attractive when the same design must be repeated with a smooth molded appearance, consistent color, or polyurethane material that better simulates production plastic.
A complete cost comparison should include more than the unit quotation. Engineering and purchasing teams should also consider:
Master pattern manufacturing
Master finishing
Silicone mold production
Expected number of usable castings
Casting resin
Color matching
Painting and polishing
Threaded inserts
Assembly labor
Inspection
Rejection risk
Packaging and shipping
Future design changes
For example, a transparent SLA housing may be quick to print, but extensive sanding and clear coating can make every unit labor-intensive. A polished master and silicone mold may produce a batch of transparent castings with better consistency.
Conversely, a highly complex internal lattice may be practical to print but impossible to remove from a silicone mold.
DFM Tips: Factoring in silicone mold shrinkage allowance
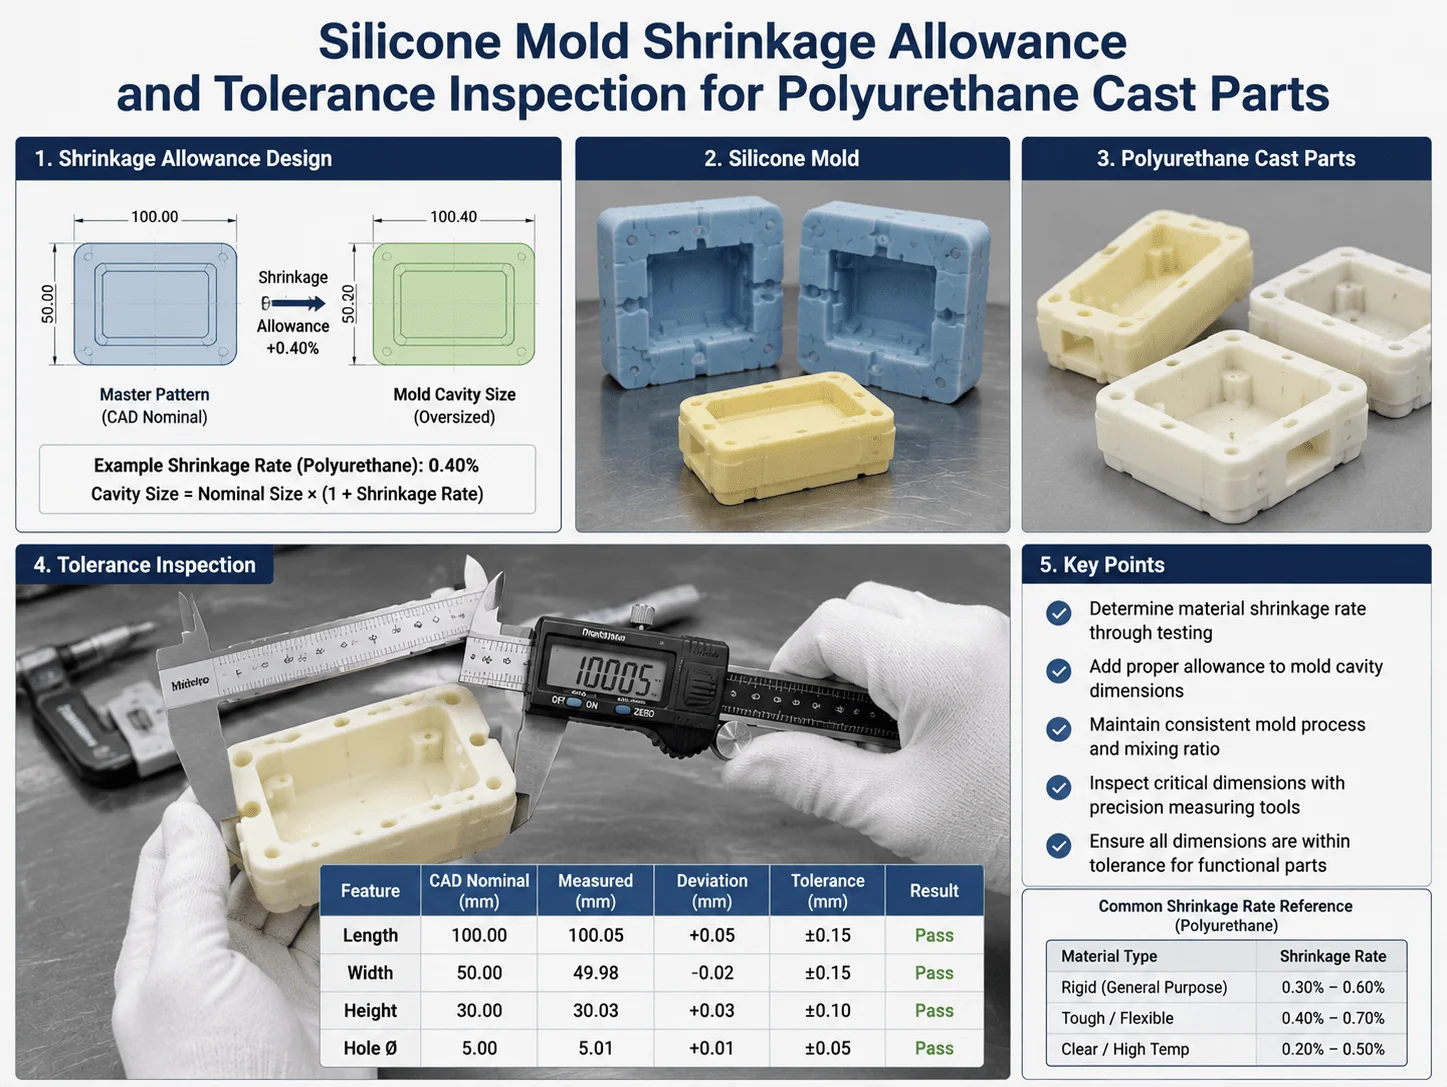
An appropriate silicone mold shrinkage allowance depends on the silicone tooling material, polyurethane resin, master pattern process, part geometry, wall thickness, curing cycle, and production environment.
There is no universal shrinkage factor that should be applied automatically to every CAD model.
Dimensional change can occur during several stages:
1.The SLA or CNC master may contain dimensional variation.
2.The silicone mold may expand or contract slightly.
3.The casting resin may shrink during curing.
4.Thin or unsupported features may deform during demolding.
5.Post-curing may cause further dimensional movement.
Engineers should identify critical dimensions and work with the manufacturer to determine the appropriate compensation strategy. The manufacturer may scale the master pattern, adjust process parameters, modify the mold, or machine critical features after casting.
Good design practices include:
Maintain consistent wall thickness.
Avoid large transitions between thick and thin sections.
Add ribs instead of creating massive solid areas.
Provide sufficient draft where demolding is difficult.
Avoid fragile hooks and severe undercuts.
Use practical corner radii.
Identify sealing surfaces and connector locations.
Leave machining allowance on precision features.
Use metal inserts for threads that will be assembled repeatedly.
Avoid tight tolerances on purely cosmetic surfaces.
Tolerance strategy should reflect part function. A handheld enclosure may tolerate moderate dimensional variation on its external shell, while PCB mounting bosses and connector openings may require tighter control.
For a complex assembly, produce and inspect one or two first articles before releasing the complete batch. Measure critical dimensions, test assembly, and adjust the process if needed.
Dimensional Expectations by Feature Type
| Feature type | Recommended approach |
| Exterior cosmetic surface | Use practical general tolerance |
| PCB mounting boss | Identify as a critical dimension |
| Connector opening | Validate using the real connector |
| Threaded hole | Use a metal insert where practical |
| Bearing location | Consider secondary CNC machining |
| Snap-fit feature | Test several samples before batch approval |
| Transparent window | Control both fit and optical finish |
| Sealing interface | Validate compression and dimensional consistency |
Aesthetics and Sourcing Strategy
Achieving Production-Grade vacuum casting surface finish
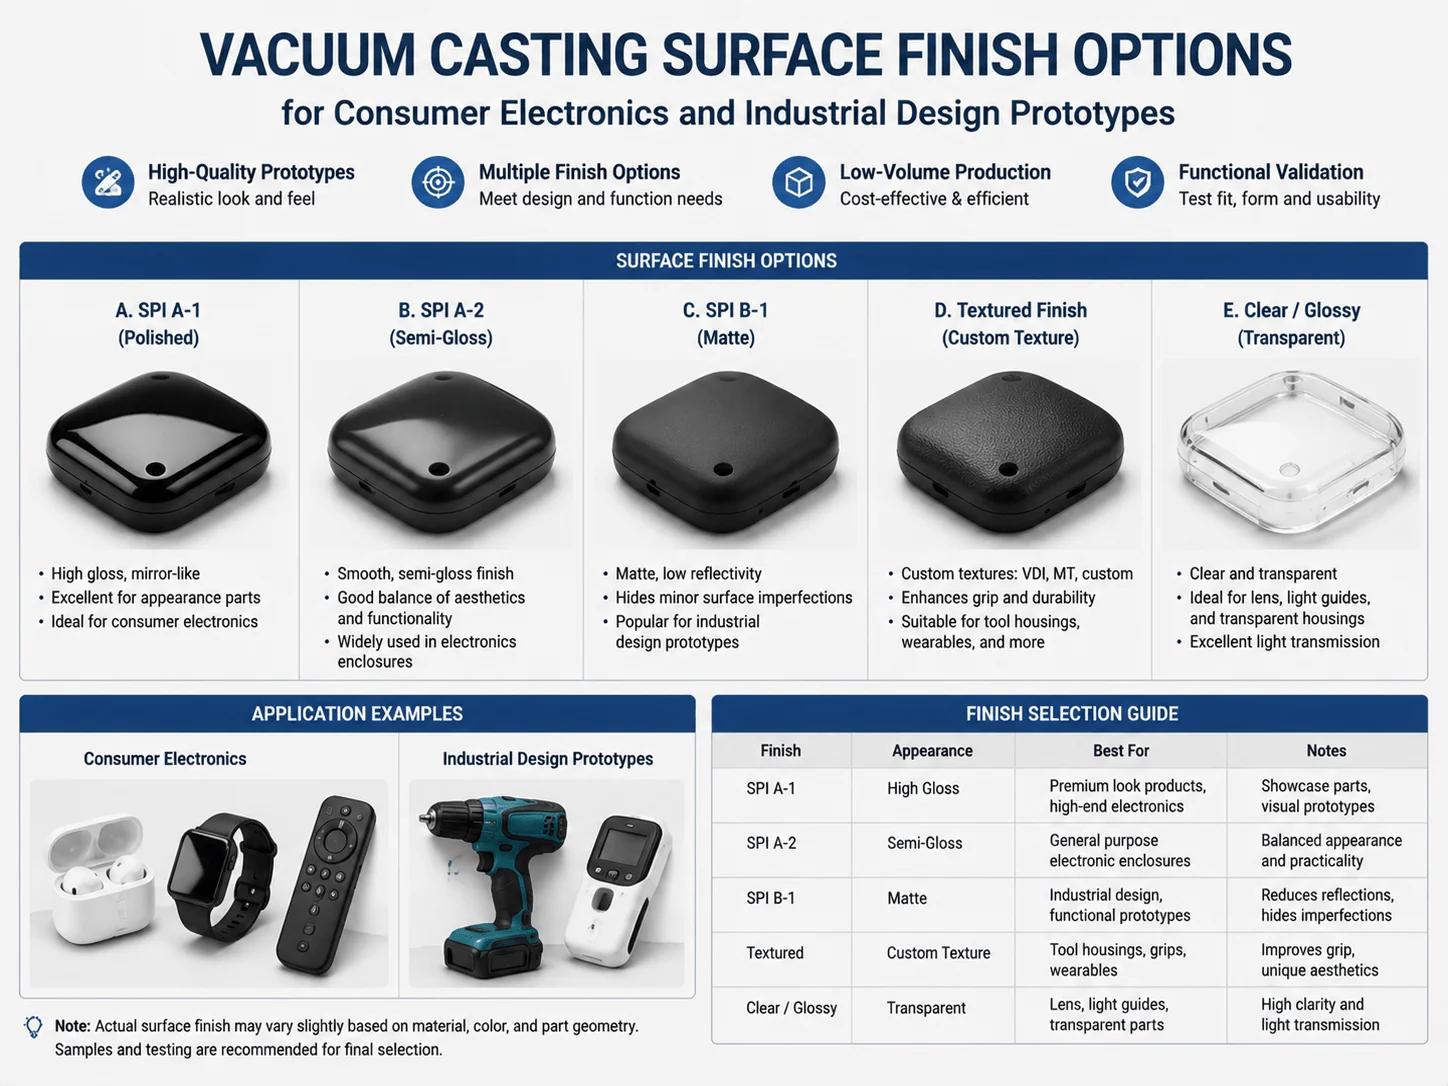
A production-grade vacuum casting surface finish starts with the quality of the master pattern.
Silicone molds reproduce detail extremely well. This includes polished surfaces, fine textures, tooling marks, print layers, scratches, and sanding defects. Any defect left on the master may be transferred to every casting.
A master pattern can be prepared for:
High-gloss surfaces
Matte finishes
Fine textures
Molded grain
Transparent components
Painted color standards
Raised or recessed logos
Silk-screen graphics
Soft-touch coatings
For a high-gloss component, the master must be polished carefully because every defect may remain visible. For a matte or textured finish, controlled blasting, textured paint, or a defined grain may be applied to the master.
Transparent castings require special attention to:
Master polishing
Mold cleanliness
Resin mixing
Degassing
Bubble prevention
Cure control
UV stability
Final polishing or coating
Color can be mixed into the polyurethane or applied as paint. Pigmented resin gives the entire component a consistent base color, while painting provides more precise color control and a wider range of metallic, soft-touch, or high-gloss finishes.
For consumer electronics and smart hardware, cast parts may also receive silk-screen printing, pad printing, laser marking, metallic coating, or final assembly.
Parting lines and gate locations should be reviewed during DFM. Poor gate placement can leave visible marks on important cosmetic surfaces.
Class-A surfaces should be identified clearly in the drawing so the supplier understands where appearance requirements are strictest.
A cosmetic quality agreement should define acceptable levels for:
Parting lines
Gate marks
Color variation
Surface gloss
Texture consistency
Air bubbles
Sink and warpage
Painting defects
Assembly gaps
Handling marks
Financial Edge: silicone molding for low volume plastic parts
From a sourcing perspective, silicone molding for low volume plastic parts reduces capital exposure during pilot production, customer trials, investor presentations, certification preparation, and market validation.
Instead of paying for a production mold before the design and demand are stable, procurement teams can order a controlled batch while preserving the ability to revise the product.
The process is particularly suitable for 10–100 units of:
Medical device housings
Automotive interior components
Consumer electronics cases
Robotics covers
Laboratory equipment
Industrial control parts
Transparent inspection covers
Exhibition and marketing samples
However, the lack of metal tooling does not mean every vacuum-casting project is inexpensive.
Costs rise with:
Large part volume
Multiple silicone molds
Complex parting lines
Difficult undercuts
Extensive finishing
Tight dimensional requirements
Premium or specialized resins
Multiple colors
Insert installation
Assembly requirements
Low-Volume Cost Structure
| Cost component | One-time or recurring | Optimization opportunity |
| Master pattern | Primarily one-time | Finish only functionally or cosmetically important areas |
| Silicone tooling | One-time per mold | Simplify parting and demolding |
| Casting resin | Recurring | Hollow non-critical sections where practical |
| Casting labor | Recurring | Design for easy filling and demolding |
| Finishing | Recurring | Restrict painting and polishing to visible areas |
| Inserts and assembly | Recurring | Standardize hardware and operations |
| Inspection | Recurring | Focus detailed inspection on critical dimensions |
Purchasing teams should compare total batch cost rather than looking only at the stated unit price.
Ask the supplier:
How many usable components are expected from each mold?
Is backup tooling included?
What happens when a mold reaches the end of its life?
How are rejected parts handled?
Is first-article approval included?
What happens if the CAD design changes after master approval?
Are finishing and assembly included in the quotation?
A useful sourcing strategy divides the project into stages:
1.Produce and approve the master pattern.
2.Create the silicone tooling.
3.Cast and inspect a first article.
4.Confirm color, finish, dimensions, and assembly.
5.Release the initial validation batch.
6.Collect user or field feedback.
7.Revise the design before rapid tooling or injection molding.
This staged workflow reduces both technical and financial risk.
Practical Application Scenarios
Medical Diagnostic Enclosure
A product team needs 30 handheld housings for usability studies. The housings require painted surfaces, transparent windows, threaded inserts, and a flexible grip.
Silicone molding can reproduce the rigid housing, transparent cover, and overmold simulation without production tooling. Several grip hardness options can also be compared during user testing.
Automotive Interior Control Panel
An automotive supplier needs 50 control-panel prototypes with a molded texture and several color options.
Vacuum casting provides repeatable appearance for design review, lighting evaluation, installation checks, and customer approval.
Robotics Protective Cover
A robotics company needs 20 protective covers around a moving joint. SLS printing may be faster for early dimensional checks. Once the design is approved, vacuum casting can produce smoother and more presentation-ready parts.
Consumer Electronics Pilot Launch
A smart-hardware startup needs 80 premium-looking enclosures for a limited market launch.
Silicone molding avoids a major tooling investment while providing painted, assembled housings that can be placed in the hands of real customers.
Industrial Transparent Component
An equipment manufacturer requires transparent covers to observe fluid movement and internal mechanisms.
Vacuum casting can produce polished transparent components, provided optical expectations, chemical exposure, UV stability, and long-term operating conditions are reviewed in advance.
Accelerating Your Sourcing Cycle
Choosing Professional custom silicone mold making services
Professional custom silicone mold making services should provide more than basic urethane casting.
A capable supplier coordinates:
DFM review
Master pattern production
Master finishing
Silicone tooling
Material selection
Color matching
Transparent casting
Flexible casting
Prototype overmolding
Painting
Printing and marking
Inserts
Assembly
Dimensional inspection
Packaging
For complex products, one integrated workflow reduces communication errors and shortens delivery time.
The master pattern may require CNC machining for dimensional accuracy, SLA printing for complex geometry, or a hybrid method combining both processes. The supplier should recommend the most appropriate route based on function rather than applying one process to every part.
Evaluate potential suppliers based on:
Experience with comparable parts
CNC and SLA master-pattern capability
Available resin systems
Transparent-part expertise
Flexible-material and overmolding capability
Color matching
Painting and texture control
Insert installation
Dimensional inspection
First-article approval
Revision control
Low-volume assembly
International packaging and delivery
A complete RFQ should include:
STEP or native CAD files
2D engineering drawings
Required quantity
Material-performance targets
Color and finish
Shore hardness for soft parts
Critical dimensions and tolerances
Threads and insert requirements
Class-A surfaces
Intended application
Testing conditions
Delivery requirements
The supplier should also ask whether the project is expected to transition into injection molding. Early knowledge of the production plan allows engineers to recommend wall thickness, ribs, bosses, draft, and parting strategies that simplify the future tooling transition.
Frequently Asked Questions
What is silicone molding used for?
Silicone molding is used to manufacture small batches of plastic-like or elastomeric prototype components using soft silicone tools. Typical applications include housings, covers, grips, medical models, automotive interiors, robotics parts, and consumer products.
Is silicone molding the same as vacuum casting?
The terms are closely related. Silicone molding refers to the flexible tooling, while vacuum casting describes the method used to mix, degas, and introduce resin into the mold. Many suppliers use “vacuum casting” to describe the complete process.
How many parts can one silicone mold produce?
Mold life depends on part geometry, casting resin, undercuts, surface quality, wall thickness, and handling. The supplier should estimate the expected output for the specific design rather than applying one fixed number to every project.
Is silicone molding cheaper than 3D printing?
For one to five parts, 3D printing is usually less expensive. For a repeated batch of identical parts, silicone molding may reduce average unit cost and provide a more consistent molded appearance.
Can vacuum-cast parts be used for functional testing?
Yes, provided the selected polyurethane has appropriate properties for the test. However, casting resin may not behave exactly like the final injection-molded thermoplastic.
Can silicone molding produce transparent components?
Yes. Clear polyurethane can be used for transparent covers, housings, lenses, and fluid-observation components. High clarity requires a polished master, controlled casting, careful finishing, and realistic optical expectations.
How should engineers account for mold shrinkage?
Discuss the silicone mold shrinkage allowance with the supplier. Compensation depends on the master, silicone, polyurethane, geometry, curing process, and tolerance requirements.
Can silicone molding simulate overmolding?
Yes. Rigid and flexible casting materials can be combined to evaluate grip geometry, color separation, sealing concepts, and ergonomics. Prototype adhesion and material performance may differ from production overmolding.
What files are required for a quotation?
Provide a 3D CAD model, 2D drawing, quantity, material targets, color, finish, Shore hardness where relevant, tolerances, inserts, intended use, and delivery requirements.
When should a project transition to injection molding?
Injection molding should be considered when the design is stable, market demand is validated, production materials are finalized, and the required volume justifies the cost of metal tooling.
Silicone molding fills an important gap between one-off additive prototypes and production injection molding. It enables engineering and sourcing teams to validate complete assemblies, evaluate production-like appearance, conduct usability studies, and manufacture limited batches without committing to expensive hard tooling.
The best results come from matching material properties, mold design, tolerance strategy, and master-pattern quality to the real project objective.
Medical teams must verify material documentation. Hardware developers should design overmold interfaces carefully. Mechanical engineers must account for shrinkage and demolding. Procurement managers should compare total batch cost and consider the future production strategy.
Scale Your Low-Volume Project with GC-Prototype
Scaling from a single design to a pre-production run should not deplete your budget. Whether you are a Senior Mechanical Engineer developing sealed healthcare devices or a Procurement Manager sourcing low-volume consumer electronics casings, GC-Prototype delivers.
Our capabilities include CNC and SLA master patterns, silicone tooling, vacuum casting, rigid and flexible polyurethane parts, transparent casting, prototype overmolding, painting, color matching, silk-screen printing, insert installation, inspection, and low-volume assembly.